Friday, November 13, 2009

Apture - Snapshot tool for your wikis and blogs

Apture allows you to save webpages within your blog or wiki without leaving your site.
First you will need to download the plug in, click on Download Plugin.
Select a blog type and then click on the Install the extension (in this example Firefox)
You will need to open a new post page and the extension will be added.
Follow the instructions to activate the link.
Highlight the text that will open up the Snapshot
Click on the Apture link button
Paste in the URL address for the snapshot, click Go
Choose whether you want an External Link or a snippet then click on Create Link

Hold your mouse over the Link below (don't click) to see the snapshot window

Here is a snapshot of another one of my blogs

Or click on the Apture Embed button, paste in URL and click Go


Wiki Instructions
For a Wiki click on Other Platform and click on Get Started now then Create a Super Embed
Choose from the selections; article, map, audio, document, person, news article, webpage
Type URL address, click Go
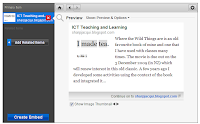


An image will appear of the website.
Click on Create an Embed
Click on Copy this code
Paste into your Wiki Widget.

Monday, November 2, 2009

Textoriser -Textorise your images

Textoriser turns your pictures into words. In this example I have used the text from my ICT Teaching and Learning blog and my avatar.
First download the software from Textorizer, install the software. Upload a picture.

To use your own text, copy the text into a Word/Pages file and save the file as a .txt.
Click on the Change Text and browse to your text file.
There are two choices of Textorizing, the one I prefer using is Textorizer Two.

You will need to play around with the the font scale and text size (drag the blue bars up and down like sliders).
Click on Textorize when finished.
Maximize your screen before taking a Screen Capture

Here is an example of the same graphic with slightly bigger text.

Here is an example of a Picture created in KidPix, saved as a jpeg. The text was typed in Word and saved as a text file. Here are 3 different examples where I have adjusted the font scale, text size and Line height. Click on each example to see the full image.

Wallwisher in the classroom


I have seen Wallwisher used in a few different ways by teachers, which has of course inspired me to write this post and come up with some more ideas of how to use it. So instead of writing the ideas in this post I have added them to the Wallwisher. Please feel free to add but additions are moderated.
If I was using this with students in real time I would not moderate it until later.
You do not have to set up an account, but for classroom use I would as you can save and view all of your walls.
First choose your wall colour and add distinguishing words to the end of your wall URL if you would like to personalise the wall. Click on the options of who is able to view or post notes. If you want to approve the posts click on the check box.
Type in a title for your Wallwisher by clicking on Click here to edit title and do the same for the Subtitle.

Add an Icon Picture to the wall by clicking on Click to select image. Choose one from the ones provided or upload a  picture from your own picture library by clicking on the Browse button.
When you have finished click on the 'done' button in the bottom right hand of the screen.
To add a note, double click on the wall, type in your note which is limited to 160 characters.
You can add links to a website or to a  movie by pasting in the URL at the bottom of the note.

The notes can be moved around and organised.
The notes can only be edited or deleted by the wall owner.
If you have given a unique name to your wall, anybody can view and add to it http://www.wallwisher.com/wall/ineducation but in this case I am moderating the comments.

Hero Machine Version 2.5

Hero Machine Version 2.5 is another Superhero site. This one is very comprehenisive and offers many choices. I particularly like how you can add a companion.


There is also four choices of bodies.


Once you have added all the parts and features to your superhero then you will need to take a screen capture
 Update 3 November 2009
Jeff the Designer left a comment about my post and told me that HeroMachine Version 3.0 is in Alpha mode, it looks amazing, heaps more options. Kids are going to have fun with this one!

Thursday, October 22, 2009

Animoto for Educators

The standard Animoto website allows you to make 30 second videos for free with about 12 items (photos or video clips). Add text over slides and spotlight the special slides. Add music by choosing tracks available from the Animoto library or upload from your own computer. Once the movie is generated it can be uploaded to Facebook, Twitter, or any social networking site, and it can be embedded in blogs and wikis.


Animoto for Educators allows more choices. Click on the Apply button to lodge an application for Animoto for Educators. Create longer videos and export to Youtube or download to your own computer.
Animoto for Education - Bringing your classroom to live

Wednesday, October 21, 2009

PhotoPeach - Slideshows

PhotoPeach allows you to make slideshows out of photos, add captions to each slide, add music and then finally add a quiz to the end of the slideshow. Once the slideshow is finished, the viewers can leave a comment in the comment box.
You need to sign up for an account first.

Step One: Upload photos
Step Two: Arrange your images into the order you want to present them
Step Three: Type in a title and choose your music. There is a choice of instrumental, classic, search YouTube or upload your own
Step Four: Click Finish
Step Five: Play the slideshow and add captions by clicking on Add caption
Step Six: Type in the caption, choose where you want to place it 'Center or Bottom'
Step Seven: Click on the next photo and add a caption, repeat with all of the photos


Step Eight: Finally, add a quiz by adding first a blank slide and then click on the Quiz button. Type in the Quiz. Complete the slideshow by clicking on OK at the top of the page.

There are several  ways of sharing your slideshow.
Email to friends, upload to Facebook, MySpace, add a link to Twitter, embed a copy into your wiki or blog or copy a link to the slideshow that could be inserted into PowerPoint,Word, Keynote, Pages, Zoho or Google Docs.


Methods of Drafting on PhotoPeach

Voki - Animated Avatar

A Voki is an animated avatar.


You can customise the avatar's look.


You can add voice by typing in some text and a computer generated voice will read it out, or record your own voice using the microphone.
You can add backgrounds.


And  you can publish to your blog or wiki.
You can also send to an email address and a phone
You will need to set up an account.


Get a Voki now!

More Superhero Avatars

Following on from my blogpost about The Hero Factory, there is another Superhero site. Marvel has their own website for creating superheroes.
Click Begin and then create your base.


Then go through all of the tabs to create your superhero.


To save the Superhero you need to set up an account or you can click Download and then take a screen capture.

Kid Friendly Avatar Maker - My Avatar Editor

When you show My Avatar Editor to children they recognise it straight away as it looks like the avatars (known as Mii) you can make on a Wii. It is very easy to use.
Type in your name and creator name.
Choose Gender,
Choose colours.
Then click on the buttons below to personalise your avatar.
Once you have finished click on the the Save button (the first button)


There are several save options.
I recommend using the Export option as that allows you save it as a Jpeg. You can also select the Pictures size and a background colour.

Tuesday, October 6, 2009

Tagul - Interactive Word Clouds

Tagul is an interactive Word (Tag) cloud. Each word is linked to a website so it becomes a navigation tool for the viewer. How it is different from Wordle is
  1. words are interactive, it is a tag cloud
  2. you can have several different fonts
  3. you can have the words in a shape
It can be time consuming as you have to go through every word to delete common words or words that you don't want to appear in the cloud. It is still very new and the developer 'Alex' has stated that there are more features to come. In this example I used my blogsite 'ICT Teaching and Learning' to generate the words for the Word cloud, all the words in the cloud point to Google but this can be tweaked to point to other websites. Once you have played around with it for a while it is quite easy to mix and match colours, fonts, shapes and backgrounds.
It will be interesting to see how this application develops and how we could use it in education.


Saturday, August 29, 2009

Comparing Embeddable Mindmapping software

I needed a Mindmap recently that would have hyperlinks to different sites. It also had to be readable and scrollable. Here are my efforts:

Webspiration was a little disappointing as it would not hyperlink when embedded. The links work when  you are in Webspiration. For ease of use, look, and ability to be creative I really like Webspiration but it falls down in the embedding. You can collaborate, upload Inspiration, download to Inspiration and you can publish on a webpage and access through a hyperlink, but you can't click on a hyperlink in the embedded document. See example below. All you can do is zoom in and out to view the document.


Result: Overall Features 8/10 Embed in blog/wiki 5/10

Mindmeister came up the best in embedding in a wiki/blog. It looks good, easy to navigate, simple to create map, graphics are limited, not much of a variety as Webspiration, but it did exactly what I wanted and that was to embed a diagram that hyperlinked. You can add notes and attachments and it can be collaborated on. It is also free, but you can upgrade for a price to a more sophisticated product with more features. Hover over the links and you will see thumbnails of the websites.


Result: Overall Features 8/10 Embed in blog/wiki 10/10

Wise Mapping is the third mind map I looked at. It is very similar to Mindmeister in all of the features. There is quite a range of colours, you can add notes and others can collaborate on it as well. There are limited graphics. It embeds easily enough but I didn't choose it as the one to go on my wiki as it is difficult to manipulate and view. Mindmeister was clearer and easier to view.


Result: Overall Features 7/10 Embed in blog/wiki 8/10

So my main choice was Mindmeister, the others had merits but Mindmeister was far ahead as the choice to use an embeddable hyperlinking mindmap.

Wednesday, July 22, 2009

Make a Wordsearch for your blog or wiki

Create your own Wordsearch in Wordsearch Maker and embed into your blog or wiki.
Click on the first letter and last letter of the word in the Wordsearch and it will highlight all of the words.

Make Your Own Word Search

Ways to use this application
Wordsearch on
  • your Topic words
  • spelling lists
  • novel study characters
  • number names in maths
  • focus words
  • essential word lists
  • commonly used words
  • computer terms
  • conjunctions
  • verbs
  • adjectives
  • nouns
  • titles of books
  • authors
  • geometrical terms
  • measurement terms
  • children's names in class
  • suburbs in your city
  • cities in your country
  • countries in your continent
R rating- None that I could find


If you have trouble embedding this in a wiki or a blog then add this small piece of code


Tuesday, May 26, 2009

Xtranormal Text to Movie - Publishing tool


I came across this method of presenting while viewing 21st Century Classroom. (an excellent presentation by a teacher who has dramatically changed her teaching style).
This movie had been made with Xtranormal.
You will need to sign up to an account to get started.
Choose your characters, your set, background music and voice. (Unfortunately there was no 'Kiwi voice' so I had to choose Australian female)
Then type (or copy/paste) your text into the 'Write the script' space.
Add more blocks to your movie and add more script. You can then drag camera angles, sounds into the script. You can change expressions and body poses.
Some uses for this application
  • students can publish their writing
  • present their research
  • use as a practice for their speech writing
  • teachers can use it post instructions for next topic
  • teachers can use it to comment on student's work
The only down side was that there were a few dodgy characters wearing only fig leaves or underwear amongst the 80 characters to choose from. And there were a couple of actions/body poses that I would not be happy if children chose them. But that is when we should, as a class talk about what is appropriate in a classroom situation.
For the free account you have only 5 takes, so get it right early on! I discovered it is wise to create many blocks or your script voice would run into other sentences.
Otherwise this is a great way to share and present yours/or your student's work.

R rating - R13

Monday, May 4, 2009

Create a Library of recommended books


Library Thing is a great widget to add to your Blog or Wiki. I often get asked what books I have read that would be good for other people to read so I always refer people to my 'ICT Teaching & Learning' site that has the Library Thing widget down the side.
For your class wiki & blog create a library of books for students to read.
You do need to create an account to get started.

Click on Join no
w or Sign in. Click on Add Books. Type in the name of the book and click Search. It will search Amazon for all titles of that particular book. Click on the name of the book cover you like and it will be added to your Library. You can add a review or rate it by clicking on the Edit Book tab.
To add your Library to your blog or wiki, click on the Tools Tab, then click on Make a Standard Blog Widget. Make a choice of how you would like your book list to appear. Make a selection from the Preset, the Widget type, layouts etc. Edit the title then Copy the code from the right hand side and Paste into a HTML widget space in your blog or wiki.


Navigation space in Wikispaces


R
rating
R13

Monday, April 20, 2009

Create a Monet


Te Papa Museum in Wellington is showing 'Monet and the Impressionists' until 17 May 2009. At the moment (and I hope it continues) they are running a competition where you can upload your own photos and turn them into a Monet. You can email or IM them to others, embed in a blog or wiki or embed a link to the site. If you have screen capture software such as Jing or just plain Prt Scrn on Windows or Shift -Command- 4 on Mac then you can save a picture of your creation.

R rating: None

Saturday, March 14, 2009

The Hero Factory - Create a Superhero avatar


Kids love to create avatars and what could be better than turning yourself into a 'Superhero'!
The Hero Factory has a range of looks and accessories to create your Superhero.


These can then be downloaded and used as avatars. You will need to crop them before they can use them for that purpose.

A name is generated once you have finished your creation. Mine is 'Whipped Nine Tails'

I could see these characters influencing writing. Students can create them and build their own individual Superhero bios. Students could then work collaboratively together to create their own Superhero world!


R rating: None

Tuesday, March 3, 2009

Mini-Mizer and Weemees: Create characters

When I was looking for ways to create character graphics for inserting into Inspiration, Kidspiration or Smart Ideas, I was very aware of finding something to use that was 'free'. I used WeeWorld to create character Weemees, and took screen captures of them to place into the diagram I was creating.


I came across Mini-mizer from 'Reasonably Clever' which creates Lego style characters, but there was adult content, so I put a tweet out on Twitter and received a link to the 'Kid Friendly version of Mini-Mizer'. It has a lot less graphics but you can still create great characters or Avatars.
Again you will still need to take screen captures to copy these images.


R rating: R13

Friday, February 6, 2009

Webspiration gets better and better...


Webspiration is Inspiration online. It is in beta now and free, so use it while you can. You do not need Inspiration on your computer, and you can work on documents online. When you are on a computer that does have Inspiration loaded on it then you can download the document to your computer.


I can see students using this by uploading a teacher/or their own prepared template to their own Webspiration account; working on it online at home; coming back to school and downloading it for marking or sharing. If students have their own accounts they can also collaborate on documents together online.

Documents can be embedded for viewing in blogs and wikis, click on the document window to see a blown up version.


R rating: None that I could find

Tuesday, January 27, 2009

aMap: Create online arguments

Create your own arguments in aMap and embed into a blog or a wiki. As you add to your argument you are guided by keyword starters. Once you have stated your position you are directed to a window where you have to add your name and email. This would probably be better for older students who have their own email addresses as everybody who adds to the argument are directed to put in their details. This is still a fairly new programme and they are still fixing bugs so it will be interesting to see how it develops. I have put in a recommendation for password protection to protect arguments that students are writing.


R rating: none that I could find

Friday, January 23, 2009

Issuu: Create your own magazine or book or...

Create your own free publications in Issuu. Upload a PDF, PowerPoint, Word documents, or anything else with this file extension PDF, DOC, PPT, ODT, WPD, SXW, RTF, ODP, and SXI. There is a wide range of formats that you can select like book, presentation, magazine, newspaper, report, journal, portfolio, essay and manual.

Issuu can be embedded as a small book as seen below and to be seen full screen click on a page which will open up full screen in Issuu. Or you can embed as a larger document (go to Customise).
When you read the publications you can zoom in and zoom out.
Documents can be printed out.

It has a child safe option when you are publishing, so if people are publishing content that is not appropriate for children they can select No (not child-safe) to protect children.

How could this be used in the classroom?
Children can publish their own work; a book with their own stories, the class newspaper, present their research. Teachers could use it to publish whole units of work that can then be embedded in the planning page of the school wiki. There are so many ways that this application can be used.


R rating: None that I could find

BeFunky has a new look!


Not only has Befunky got a new look it has increased the effects you can use with your photos.
When you click on Get Started you get the Application Window.


Choose an effect and then upload your photo. You can change the effect at any time by clicking on the Application toolbar.

They have also included an API for developers. BeFunky can embed the application on your website. Your users will not have to leave your site at all.

The Uvatar feature is still there so that you can make your avatar.

I have used this site many times now with students and teachers and they all love it. What is especially great is how you can comicfy students photos so that they are not identifiable and use them on blogs and wikis.
This is a great upgrade!